
Pack/Inspect
The following section describes the packing process within ShipHawk WMS.
Pack Options
ShipHawk WMS packing features allow the operation to perform a 100% inspection/verification of picked orders (if desired), as well as define, document, and prepare containers/packages for shipment. If the operation does not wish to perform a 100% item pack verification, a configurable system setting will direct ShipHawk WMS to skip this step and move directly into finalizing all containers/packages to ship.
ShipHawk WMS packing also allows the operator to define or change the container/package type being packed. If picking is performed into a reusable tote, then the container size/type must be defined during packing. Alternatively, if picking is configured to direct picks into the final ship container/package (and the container/package type is then defined during picking), the packing process will provide a last opportunity to verify or change this container/package type before the container is shipped. ShipHawk WMS container types are predefined in the master data setup with length, width, height, and tare weight established so that these values never need to be entered during the shipping process.
Operations & Usage
Packing Containers
The first step in the packing process is to enter or scan the container to be packed. This container may be all or part of a fulfillment order. The container ID entered/scanned may be a reusable tote (or other reusable container) barcode, or a final shipment container barcode defined and applied during picking (see Picking).

If the container is a reusable tote, ShipHawk WMS will prompt the operator to enter/scan the FINAL container ID to be used. This ID will be used to control the flow of this package to and through the shipping process.

Next, the operator will verify and/or change the container/package type. Like all elements in ShipHawk WMS, any new values will auto-populate if the operator begins to enter a few characters. Or alternatively and preferably, the operator can scan a container type barcode defined at the pack station on a placard to capture the container/package type to be used for shipment. These container type IDs are defined in the ShipHawk WMS List of Values setup (see Administration).

If Item Verification is enabled, ShipHawk WMS will then successively prompt the operator to scan an item in the container/package being packed until all items are verified as packed in the container. At any time, the operator can create a new container/package, and pack into that new container/package. At any time operator can refer to a real time display in ShipHawk WMS which displays what is remaining to be packed/verify at all times.
If the quantity picked is greater than quantity one, ShipHawk WMS will prompt the operator for the quantity present in the container, rather than asking the operator to scan each unit. However if the quantity expected (picked) is just quantity one, the initial scan will verify that item.
If any order or item attributes need to be captured during packing (defined by configuration settings in ShipHawk WMS), the operator will be prompted to capture each attribute required.

Once packing is complete, ShipHawk WMS will check the configuration rules for pack list printing for that container. If a pack list is required, it will be generated and printed at that time.
If Item Verification is disabled, ShipHawk WMS will not require a scan of each item to be packed and alternatively will immediately perform all necessary post-pack processes defined (such as printing a Pack List) and then either:
- Allow the operator to proceed packing the next container, or
- Initiate shipment processing for the current container if the Integrated Pack/Ship is enabled.
Inspecting Containers
At any time, an operator can Inspect an inventory container, whether it is staged for shipment, being packed, being received, or in inventory. This is designed as a high-speed scanning option which only provides feedback to an operator when a incorrect item is found in a container. This way, the operator can continuously scan containers and items, and as long as no “alert” is fired, it indicates that all item(s) scanned belong in the container scanned.
Tip
This feature can be very effective option to facilitate matching of printed SSCC-18 labels for retail compliance to full cartons previously picked. Specifically, if SSCC-18 labels must be generated after packing, and a variety of full cartons have been picked, this feature will help verify that the proper label (with SSCC-18 barcode) is placed on the proper carton.
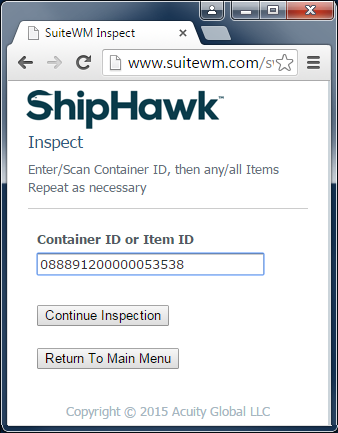
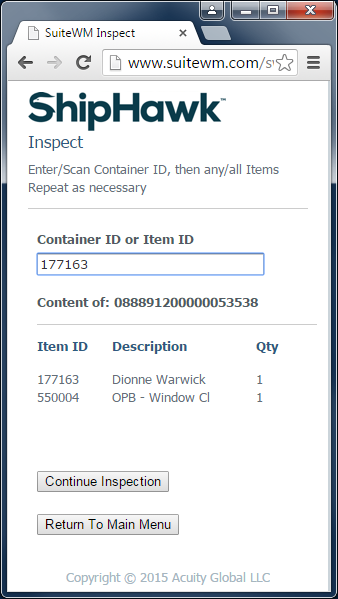
To start this feature, the operator will select “Begin Inspection” from the Packing page. At this stage, the operator will simply scan a Container ID which requires inspection. ShipHawk WMS will display the content of that container on the page.
The operator will then scan one of many Item IDs list on (or in) that container. Like all Item scans, any alias such as the UPC, GTIN, Vendor Code, etc may be scanned. As noted above, there is no “positive” confirmation of the result; rather, ShipHawk WMS will only “alert” the operator if a mismatch is detected (incorrect item in container or a bad container ID). At any time, an operator can scan a new container and or an additional item in the current container item without ever having to read the screen or switch to another page.
Modifying Containers
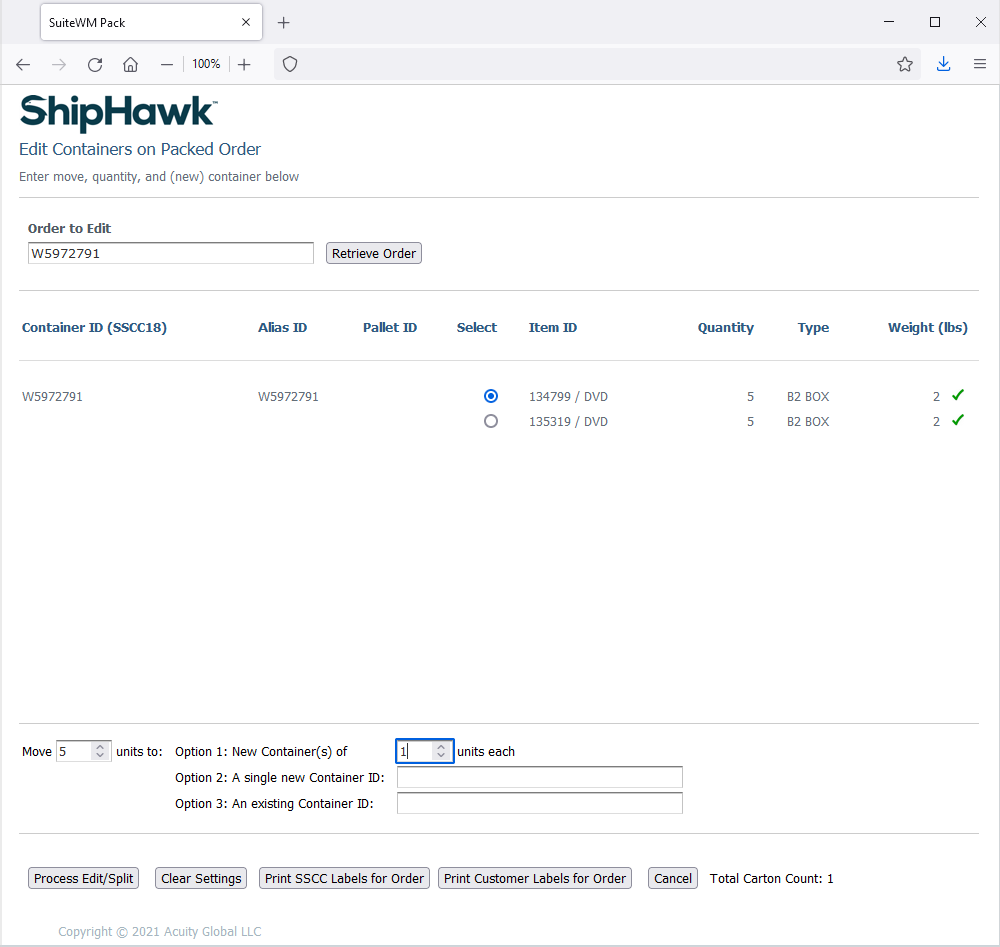
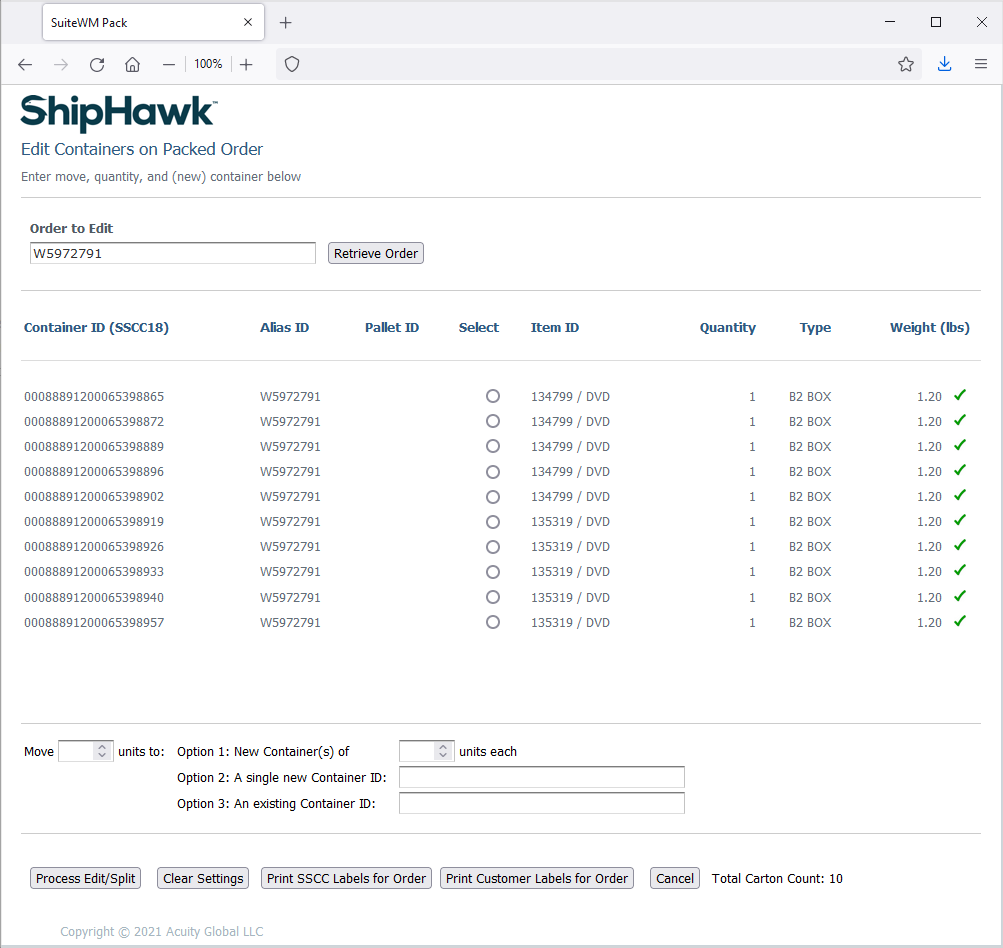
The process of modifying containers is referred to “Pack Edit” in ShipHawk WMS. New containers can be created, existing containers can be split or combined, and/or items can be moved between containers with ease using Pack Edit. Custom labels or standard SSCC labels can be requested for the resulting containers defined. The example below illustrates splitting a single container into 10 individually identified containers so that unique SSCC labels can be requested for each resulting container.
The operator first enters the order number to retrieve all containers for that order. The operator then selects an item to “edit” in a current container. In the example below, the operator has requested to split 5 units of the first item into 5 separate containers
The operator then repeats this process for the second item in the original container, resulting in the creation of 10 total containers for the order. The operator may then request to print custom labels for each container on this order, or print customer-specific SSCC labels (based on a seamless integration SPS Retail Label Cloud Service).
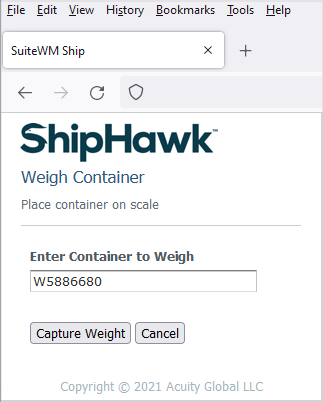
Weighing Containers
Picked containers may be weighed by an operator during the packing or shipping operation. ShipHawk WMS uses the PrintNode cloud service which integrates most parcel scales and will automatically capture a weight from the scale (without the need for manual entry) for a container, when requested. Container Types (which pre-define container dimensions and tare weight) or specific dimensions can also be captured during the weighing process.

Building Pallets
At times, the operation may need to stack or build pallets from many individually picked containers, potentially for the same order, or possibly for a set of consolidated orders to be shipped to an individual customer. To perform this task, the operator will first scan a barcode to represent to Pallet ID to be created. The operator will then scan one or many Container IDs to “stack” or “build” onto this pallet. If multiple pallets need to be merged into a single pallet, then the operator will simply scan each Pallet ID to consolidate them together. At any time, an operator can scan a Pallet ID to review the container content on that pallet. Custom Labels can also be requested for any pallet, or for the containers on that pallet during this consolidation process.
